Fly Tying Leg Knot Tool
It seems like most fly fishers experience this… You walk into a fly shop, pick up a handful of flies, then attempt to get some "local intel" from the cashier… Then your jaw drops as you hand over $17.49 for 5 little pieces of wire, fur and thread.
In the parking lot you look at your little cup of flies knowing you'll lose most of them in the trees…sigh.
So, you're considering taking up the art of fly tying. It doesn't get much more rewarding than making a great cast, watching a trout sip, and then releasing knowing you fooled that trout with a fly you tied.
How To Start Tying Flies: (Everything You Need)
I've broken this article up into the four primary areas to get started fly tying:
- What Tools Do You Need?
- Which Materials are Needed to Tie Flies?
- Popular Hooks for the Fly Tyer
- Types of Flies and a Strategy to Get Started
What Tools Do You Need to Tie Flies
I'm going to describe the basic tools and a little bit about each. I didn't want this article to be about how to tie flies, but more about what you need, what all the tools are called, and about how the tools and materials are used.
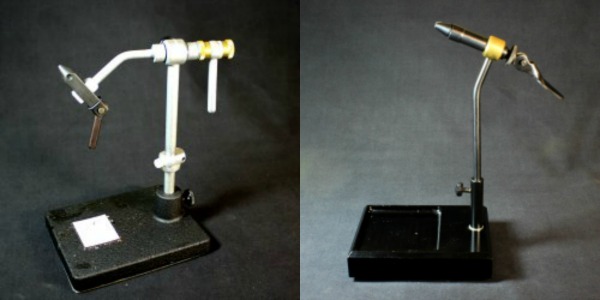
1. Fly Tying Vise – How Serious Are You About Tying?
Hook Jaws or Clamp – This is the most important component of a fly tying vise. The hooks MUST be held securely without slipping or damaging the hooks. A great test is to clamp a hook into the vise and push down. The hook should bend before slipping in the jaws.
Tying vises range in price from nearly free at a garage sale to over $900. If you think you are going to tie more than 2 dozen flies per year, I would recommend getting a rotary vise. In my opinion the best vise for money is the PEAK ROTARY FLY TYING VISE. (Links to amazon for a price check and reviews)
Some things that stand out to me about the PEAK FLY TYING VISE
- Made in the USA.
- Easily adjustable rotary tension .
- Holds hook sizes from tiny size 24 to 2/0.
- The base version is white (helps to see), and stable.
- Constructed with quality materials: Tool Steel Jaws, Stainless Steel and Brass
The three most common ways to secure the hook in a tying vise are:
- Cam Lock: my 25-year-old Renzetti Traveler has a cam lock jaw. After years of abuse it still functions flawlessly. Cam lock jaws are super-fast to use and will adjust to most hook sizes. Watch out though, some cam lock designs have the lever close to the hook which can interfere with wrapping.
- Pull Pinch: this type of vise has a pinching jaw that is pulled shut by wedging the jaws into the body of the vise. The locking lever is behind the vise body.
- Spring Clamp: the jaws of this vise are always in tension. To open, an arm provides the leverage to overcome the jaw tension. I've had mixed results with the cheaper model in the under $75 price range. Above $75 gets you into a higher quality spring clamp system that is a lot more reliable.
Rotary Fly Tying Vise or Not – it's about money
I have 5 fly tying vises two of which are rotaries, and for sentimental reasons, my +25 year old Renzetti is my favorite. It was a gift from my wife at a time when spending extra cash on a fly tying vise wasn't in our budget. If I were to recommend a tying vise it would be my second rotary – the PEAK Rotary Fly Tying Vise . (link to Amazon to read more)
If money isn't an issue get the REGAL Medallion. If you've been to a fly fishing show or seen PRO's tying a REGAL Fly Tying Vise is probably on their bench. I've interviewed many professional tier's and the Regal Medallion (Amazon Link to check prices and reviews) is usually mentioned.
2. A Good Fly Tying Light – old eyes need help
I used a small incandescent lamp for a long time. It was hot, the light color wasn't very good, and it was so big I was always moving it. The new LED models are cool, small, and can pinpoint light exactly where it's needed.

3. Bobbin – holds the fly tying thread
These little tools hold spools of tying thread and dispense it through a tube so you can accurately wrap thread onto the hook. Think about getting a couple of these.. if you can afford it, the Rite models are probably the best. Qualities to look for:
- Hand comfort: if the bobbin has sharp edges or square corners it will become uncomfortable after a while. I typically only tie flies 3 or 4 times a year, but each tying session might be 2 to 4 hours so comfort counts.
- Thread tension: the simpler models require you to apply tension by squeezing the spool while tying. The Rite brand thread bobbin has a disc drag that precisely tensions the thread.
- Tube material: ceramic or metal. Thread is abrasive, after a while a cheap metal tube will wear down and then it cuts the thread while wrapping. Consider getting ceramic, it is very durable.
- Tube length: this is a personal preference, but some folks like really short tubes. I don't have a preference; most thread tubes are about 2 inches long.
If you're looking for a Bobbin Recommendation – Get the RITE BOBBIN (AMAZON LINK) Yes that picture up above is my hand holding a RITE Bobbin.
4. Fly Tying Scissors – short and sharp
If you get into fly tying you'll learn the same thing that barbers have learned. Quality scissors matter! Cutting threads, fur, synthetics and lead dulls scissors quickly. You can buy 3 or 4 cheap $7 scissors or buy a little bit better pair for around $15. I personally like the Dr Slick 4 inch straight all purpose.
Great reviews and a proven track record. Dr Slick Scissors are on fly tier's desk all over the world. I got mine from Amazon – check them out here link – Dr. Slick All Purpose Scissors
If you plan on tying with deer or elk hair, scissors with a curved tip can be helpful.
5. Heavy Duty Scissors – for everything else
It seems like I'm constantly cutting foam, lead wire and animal hides. If you have a pair of heavy scissors you can significantly increase how long your tying scissors stay sharp.
6. Fly Tying Hair Stacker – aligns hair tips
If you are desperate you can get by with a straight spent bullet cartridge, but a dedicated hair stacker is way better. If you plan to tie flies for bass, a good hair stacker is essential.
How stackers work: You clip a section of hair off the hide (usually a clump about the size of a pencil diameter). Pull those little fine pieces of fur out at the base of the clump. Then drop the hair TIPS FIRST into the stacker. Tap the base with the hair on the table top 3 to 5 times. Turn the stacker horizontal and separate the base from the body. The hair tips should all be even and exposed enough to grab ahold of them. Now tie the hair onto the hook.
7. Hackle Pliers – holds fly tying feathers
These are used to grab hackle feathers by the tips. It's nearly impossible to wrap a hackle feather that is less than 3 inches long unless you use hackle pliers. Two benefits of hackle pliers: 1) less waste, pliers allow you to work with short pieces of material. 2) they also free up a hand as the weight of the pliers will keep the hackle from unwinding while you tie it down with thread.
I've seen all kinds of plier models. Look for the ones that have a wire loop vs the stamped spring model. With the wire loop you have the option of quickly spinning feathers on using your fingertips.
8. Hackle Gauge – measure feather barb lengths
A hackle gauge basically measures the length of the feather barbs. Hackles come in different lengths and a dry fly requires a specified length for the size of the hook/fly. This is definitely an optional tool. To use a hackle gauge, wrap the feather around the pin and measure the length of the feather barbs on the scale, this correlates to the correct size fly.
9. Craft Knife – cutting other fly tying materials
Great for cutting foam sheets used for tying beetles and ants.
Razor Blades make a mess when fly tying with hair..
If you get started tying stacked deer hair, flies like poppers or mice using a razor lets you shape the hair quickly. Tying stacked deer hair flies is kind of fun, but you will make a BIG mess.
Check out this video from tightlinevideo – clipping, cleaning and stacking deer hair

10. Bodkin – you need something pokey for fly tying
Think of a long needle with a handle. Great for applying head cement and pulling fur or feather fibers out to make the flies look "buggy". Another use is cleaning glue out of the hook eyes.
11. Toothpicks – don't get glue on everything
Many folks use toothpicks to apply head cement so your bodkin stays clean.
12. Half Hitch Tools – a fast knot tool for tying flies
The Half Hitch is the most common way to tie off thread at the head of the fly. Most of the time your bodkin will have a half hitch tool opposite the needle. Essentially the half hitch tool is a small diameter tube used to reach over the hook eye and tie a half hitch. A half hitch knot requires the thread to wrap over itself. A great way to think about this is a tying a overhand knot around the hook.
Half hitch tools come in a variety of diameters. The best size to use is just big enough to slide over the hook eye.
13. Whip Finisher – a tool for placing a fly tying knot
This tool allows you to tie off your thread in the middle of the fly. Some great videos out there describe how to tie a whip finish with a tool or by hand. This is a more secure knot as compared to the half hitch.
14. Needle Nose Pliers – bending down barbs
I use mine to mash the barbs done on the hooks if I want to fish "barbless". Use a little bit of caution with pliers close to the hook point. It's easy to break off the needle point on the hook.
TIP Mash the barb down FIRST so you don't accidentally snap the hook after tying.
That covers the basics of fly-tying tools. You can get a lot more but with the above you should have a good start. Some things to consider: a magnifying glass (I know my eyes are bad and this helps), threader, dubbing twister for big body flies, assorted closable cups for beads, and a small magnet which can be handy for holding hooks.
Should I Get a Fly Tying Tool Kit?
Most folks start out getting a simple kit, I'm not saying this is bad. I bought one of those deluxe "do everything" kits and I still use the vise from that kit today. But +20 years later, I still have a bunch of the hooks, fur and feathers that came with this kit because I didn't have a use for them and never will. If you're considering a kit, I would buy a simple tool kit and get materials and hooks separately.
Farther down in this article I discuss my strategy for getting started tying flies. It's easy to buy a jumbo tying kit with tools, hooks and materials, but I don't recommend this. You'll end up with a box of items that collect dust that you never use.
If you'd like to know what tying tool kit is a good move, Check out the Dr. Slick Fly Tying Tools Gift Set . (Link to Amazon Price and Reviews) This set has great quality tools, that won't disappoint. Dr. Slick products have been around for years and years.
Which Materials Do I Need to Tie Flies?

Threads: with hundreds of colors and a bunch of sizes. Selecting thread can be daunting. To help narrow down the selection get Black, Brown and a Light Tan. Size 6/0 is the workhorse size used on everything from nymphs streamers and bulky dry flies. You can get 8/0 (thinner) for smaller dry flies and 3/0 (thicker and stronger) for spinning and stacking deer hair.
TIP If available get a waxed version of the thread. You can always apply it, but if pre-waxed thread is available get it. The wax helps grab dubbin.
Gel-Spun Poly Thread is getting to be popular. Super strong and very thin, this is a great substitute for 3/0 thread mentioned above. The only downside is it's a little bit more expensive.
Flosses: usually made from silk with the most common color being red. Floss provides a shiny smooth body on a fly. It doesn't help float a fly, so most of the time floss is used on nymphs and streamers. Have you ever seen the red band just behind the hook eye? That's floss.
Head Cement: just like the name implies this "cements" the thread down to the head of the fly. Typically, a fly is tied so that the head is the last spot to wrap thread, usually a tapered head is formed with the thread which is glued with head cement to make it more durable.
There are three common types of head cement.
- Solvent: almost identical to finger nail polish. Actually, lots of tiers use Sally Hansen ™ nail polish if a special head color is desired.
- UV Cure: this cement is great for building up a shiny head or instantly gluing down thread. To use, apply the glue then shine a "UV Torch" on the glue and it instantly cures.
- 2-Part Epoxy: similar to UV Cure but epoxy can be built up. Epoxy is also very durable. The only downside is once you mix up a batch it needs to be used in 5 to 15 minutes.
Wax: applied to thread to help dubbing and other materials stick to the thread. A small hunk of candle wax will work perfectly.
Lead Wire: tied to the hook shank to help sink the fly. You can use lead in a variety of sizes. I started out buy really fine lead wire.. This was a bad idea because the wire broke easily and was difficult to use. Get the .020 size wire, it is fine enough to use on smaller flies but still strong enough to handle without breaking.
Marking Pens: permanent markers like Sharpies™ work well. Use the markers to accent your flies with gill stripes and shadowing from the top of the fly down. Red, black and brown are good colors.
Fine Wire: usually used to add accent color and a little bit of weight to a nymph or streamer. Fine wire can also be wrapped to show the segmentation on a fly thorax. The most common colors are copper and gold. A quick fly to tie is called a "Copper John". It is fast to tie and is really effective.

Feathers: For the beginning fly tier, you should probably know about the 6 different types of bird feathers used in tying flies. Don't be fooled by my simple explanations below. The selection of colors, types of birds and different applications can seem overwhelming, don't let it be though. Towards the end of this article I'll provide a strategy for getting started in fly tying.
- Hackle is typically used to wrap around the hook or a post created on the hook. When wound around the hook, the fine feather fibers create a collar that simulates the wings and legs of a fly. The best hackles come from genetically modified chickens and are divided into two types.
- Saddle Hackle is a section of the chickens hide that comes from the rump of the chicken. Saddle feathers are used on dry, nymphs and streamer flies. Saddles are a good "general purpose" material for fly tying. The saddle hackles will usually have a variety of different size feathers as compared to neck hackles.
- Neck Hackle as you might guess, comes from the neck of the chicken. The finest neck hackles will have long feathers with barbs of a consistent length. Often you can purchase necks in 100 packs. A 100 pack would provide enough material to tie 100 flies.
- Marabou is that puffy fluffy stuff. The best way to describe marabou is those colorful flowing feathers seen on decorations and hats. These feathers can be used for wings and tails.
- Tails (Pheasant tail is most common). The long tail feathers that "fan-out" are what's used. The unique quality of the pheasant tail is that the feather barbs have tiny branches coming off of them. Used for fly tails, bodies and wing cases. Get some pheasant tail because it's tough to tie nymphs without it.
- Primaries- These are the large wing feathers usually coming from ducks. They are used to tie wings on flies. Another common name for a primary is "quill".
- Herls are long feathers that branch off the main stem of the feather. Peacock is the most popular herl and is used on the body of dry flies or nymphs. The herl adds an iridescent shine to a fly making it very "fishy" to look at. Herls are not very durable so usually a reinforcing material is wrapped with the feather, or over the feather. Peacock herl is used to tie the popular Griffith's Gnat.
Dubbing is any material that is twisted onto the tying thread. Dubbing is chopped fibers, in a variety of colors, used to form the body of the nymph. The dubbing is often "plucked" or brushed to give it a buggy appearance.
Hair and/or Fur: You name the animal and odds are someone has tied a fly with it. I've seen folks clip off beard hair and snip clumps of their pet dogs hair. Usually tiers use "hollow" hair common to Deer, Elk and Moose. Being hollow, the hair floats and ties onto the hook pretty well. Another common animal hair is cow tail. Hair is used for wings, tails, beards and streamers.
Synthetics: the use of synthetic material has grown exponentially in recent years. Rubbers for legs, foam for bodies, little molded legs, UV reflective, strings for body ribbing and dozens more. Synthetics add flash, action, improve flotation and can help sink a fly.
Chenille and Yarn: wool yarn is an old standby. Often blended with something that sparkles, these materials are most commonly used to build up the body of a nymph or streamer. Chenille are strings of material with fuzzy covering. Think of a pipe cleaner only on string instead of wire.
Tinsel and other shiny add-ons: Flashabou, Krystal Flash and other plastic films are tied into tails and streamer bodies to provide a little extra flash. Another common application is putting a strip of mylar over the back of a nymph to simulate a shiny wing casing.
What are the Most Popular Hooks for the Fly Tier
It's difficult to talk about hooks without having a quick description of the three primary types of flies: Dry, Nymphs and Streamers

This might sound crazy, but I have a 82 page book that just talks about hooks used in fishing. Different shapes, sizes, conversions and manufacturers…..Way too much information!
To narrow down which hooks you can buy, I'm going to first describe the fish most fly fishers are chasing: Trout, Salmon, Panfish and Smallmouth Bass. All of these fish will take any of the types of flies described above.

Here's my list of recommended fly tying hooks to start:
- DRY FLIES: Size 10 through 18 – with size 14 being the most common size I use.
- NYMPHS: 1X and 2X, Size 12 through 16 – with size 14 being the most common size I use.
- STREAMERS: 3X, Size 4 through 10 – with size 6 being the most common size I use.
Get a quality brand hook especially when your starting out. Poor quality hooks break, aren't sharp and dull quickly. Common brands are: Tiemco, Gamakatsu, Diiachi and Mustad.
Types of Flies to Tie and a Strategy for Getting Started
The neat thing about fly tying is that some of the most effective flies are the easiest to tie. But before I jump into which flies, I want you to take a step back and think about kind of fish your targeting and where you'll be fishing.
Typically, a lake or pond doesn't have active fish rising so, dry flies are out and streamers or nymphs are what to use.
Another situation is on a river with a trout rising in a regular interval. Guess what? A dry fly is the pattern of choice.
What I'm trying to say is think about the environment that you'll be fishing (lake, river, warm water or cold) and have a general mix of popular flies that covers the environmental conditions. A perfect example is mid-summer here in Michigan we get a flying ant usually in the late afternoon.
A Strategy for Which Flies to Tie
I've tied a lot of dry flies and I still do, but as a beginner I don't recommend starting out tying a lot of dry fly patterns. When you start tying dries your material purchases will exponentially grow. With the below list of flies, you can get by with a small list of materials.

- Elk Hair Caddis
- Griffiths Gnat
- Woolly Bugger
- Mickey Finn
- Clouser
- Pheasant Tail Nymph
- Hares Ear
- Beetle
- Ant
Why this list, you might ask? Each of the above flies are fast and easy to tie. As a bonus I can narrow my hook purchases down to about three or four sizes.
- With a size 6 streamer hook, I can tie Woolly Buggers, Mickey Finns and Clousers.
- A size 14 hook can make Pheasant Tails, Beetles, Hares Ears and Elk Hair Caddis.
- Finally, a size 18 will tie Ants and Griffiths Gnats.
Most of the materials are easy to come by. Deer Hair or Elk Hair can usually be obtained by a hunter friend. I've never bought pheasant feathers or rabbit fur, I just find an occasional road kill . Hackle feathers are best if you buy them. I've tried using feathers from a buddy who raises chickens and it didn't work very well. Lastly a trip to a craft store will yield foam and marabou.
To tie up this article (PUN) I recommend tying some easy favorites and buying some of the more complicated flies. Plus, making some flies yourself and buying some flies allows you to go into a fly shop to sniff around for a local "secret" fly.

Source: https://guiderecommended.com/fly-tying-tools/
0 Response to "Fly Tying Leg Knot Tool"
Post a Comment